
SUQM – Soracom Urban Quality Monitoring System
Things used in this project
Hardware components
| Soracom IoT Starter Kit - Complete | × 1 | |

|
Raspberry Pi Zero | × 1 |
| Huwaai 3G Modem | × 1 | |

|
USB-A to Micro-USB Cable | × 2 |

|
Rapid IoT Prototyping Kit | × 1 |

|
SORACOM Air Global IoT SIM | × 1 |
| micro usb otg | × 1 | |

|
Android device | × 1 |
Software apps and online services

|
Raspbian | × 1 |

|
AWS IoT | × 1 |

|
SORACOM Funnel | × 1 |

|
SORACOM Harvest | × 1 |

|
SORACOM Lagoon | × 1 |

|
Android Studio | × 1 |

|
AWS SNS | × 1 |
Hand tools and fabrication machines

|
Soldering iron (generic) | × 1 |

|
Solder Wire, Lead Free | × 1 |

|
Solder Flux, Soldering | × 1 |
Story
Why This Project?
The metro cities all around the world are facing a lot of problem because of the increasing population, which is resulting in an exponential pollution rise, which is a very serious problem and needs immediate attention.
But the problem is that there is no proper monitoring device for these Urban environments, so we are unable to get any reliable data. Even if there are devices to monitor the conditions, they are in limited number due to the current cost - to - reliability and accuracy count.
So, What's the Solution?
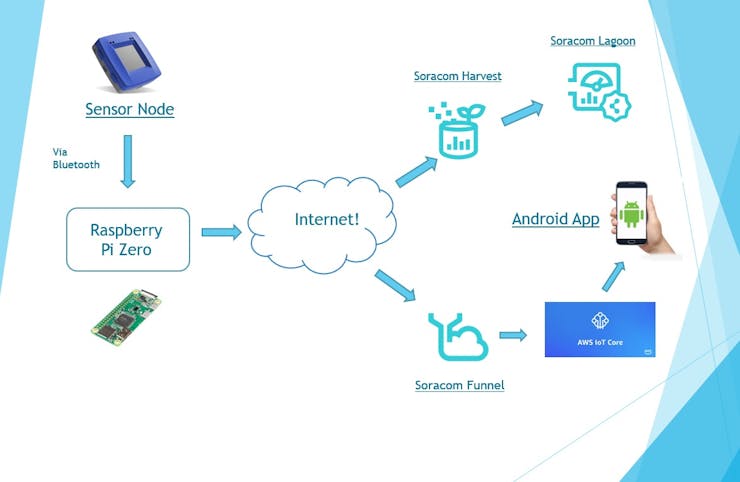
The SUQM - A Soracompoweredquality Monitor designed specifically for urban environments. Please note that I have designed this device keeping in mind the Indian metro city conditions, as cities like Delhi are one of the most polluted cities in the world when it comes to Air Pollution.So, let's get started with the project!! Firstly, lets have a look at the project schematic, which shows how our project will operate :
Next, let's have a look at the required components of the project.
Hardware Components
To get started, we will first have a look at all the components that we will be using for this project. So, let's get started.
1. Soracom's Complete IoT Starter Kit
So, these kit includes the following components :
Soracom Global SIM CardThe Soracom Global SIM provides cellular data connectivity and SMS functionality on 2G, 3G, 4G LTE and Cat M1 networks in over 120 countries around the world, fully managed right from your browser on the Soracom User Console (also included as part of the starter kit)Raspberry Pi Zero W and Official CaseSmall, easy-to-use Linux computer that supports a wide variety of programming environments to make developing your IoT project a breeze.Huawei 3G USB Modem (MS2131i) and USB OTG Adapter CableA great modem that provides 2G and 3G cellular connectivity, designed especially for IoT projects, plus a USB OTG cable to hook it up to the Raspberry Pi.Ultrasonic Range Finder (HC-SR04)This simple yet reliable sensor measures distance using ultrasonic vibrations, and is accurate up to 10 feet. We love this sensor because we can quickly capture data for easy visualization, just by waving our hand in front of it!16GB Micro-SD Card and Micro-SD Card ReaderStorage for your Raspberry Pi, plus a card reader so you can edit its contents on your computer.Perma-Proto Breadboard and Color-coded WiresFor connecting the Ultrasonic Range Finder to your Raspberry Pi, without soldering anything.USB-A to Micro-USB CableTo power your Raspberry Pi from your computer or other USB power source.Apart from this, Soracom also gave us some additional perks as a prize :
1. 25$ AWS Credits
2. 30$ Soracom credits for the project.
I would just like to Thank Soracom to provide all the required components to make a perfectly working prototype which clearly illustrates the solution!2. NXP's Rapid IoT Prototyping Kit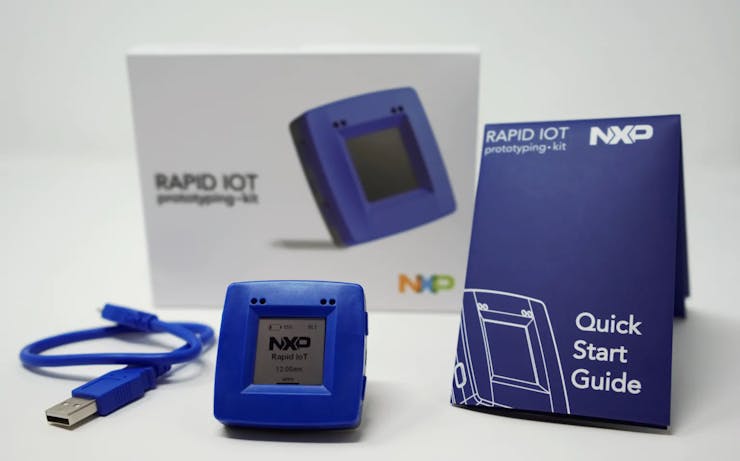
Now, this is sensor node for our project, which measures all the required values for urban quality monitoring, which includes :
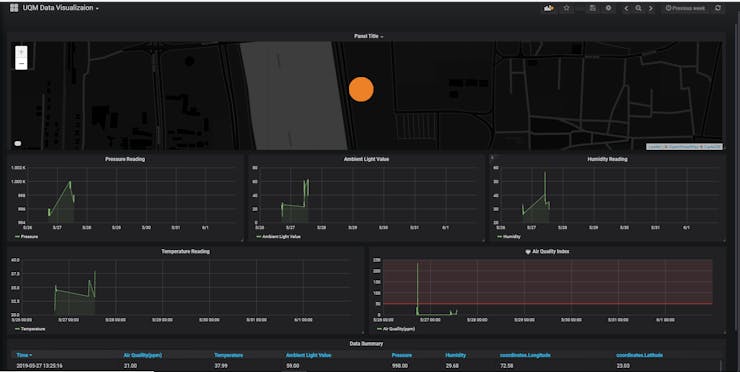
Temperature monitoring ( in degree Celsius)Humidity monitoring (in percentage)Ambient Light monitoring (in Lux)Pressure Monitoring (in kPa)Air Quality Monitoring (in ppm [parts per million])So, its provides all the required sensors in a really compact package and at the same time provides ease of connectivity using the on-chip Bluetooth connectivity, which enables the pi zero to easily fetch the sensor values.
3. A Generic Android Device
An Android device is also required for this project. I would recommend a minimum SDK level of 19 for adequate testing. I will be creating a basic android application which will act as a mqtt client and help us fetch the sensor data sent by our Hardware.
For this project, I have just fetched the raw data, but with advanced android tools it is easily possible to create visualizations like graphs with the fetched data. I am really sorry I couldn't do it as Android isn't my strong suite.
Software Components
There are plenty of software components we have used in this project. A list of the components used are :
Raspbian - OS for the Pi Zero Soracom Harvest Soracom Funnel AWS IoT core Android StudioNow, we will discuss these in detail :
1. Raspbian OS
This is the Operating System on which our Pi will run. This is a basic requirement of the project as Pi is the brain of our hardware. The reason I haven't used the lite version is that I required VNC as I was using SSH for operating the Pi.
2. Soracom Harvest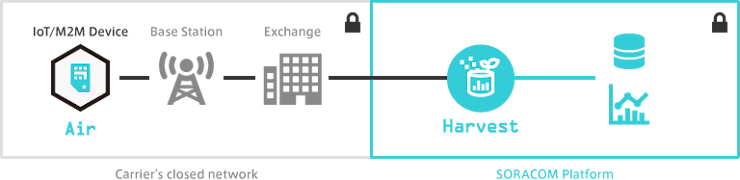
SORACOM Harvest (below, Harvest) and is a data collection and visualization services from the IoT device. Using cellular communication provided by SORACOM Air, you can easily upload sensor data etc of IoT device to cloud without trouble. The uploaded data will be stored on the SORACOM platform for 40 days. You can graph the saved data at SORACOM’s user console.
3. Soracom Funnel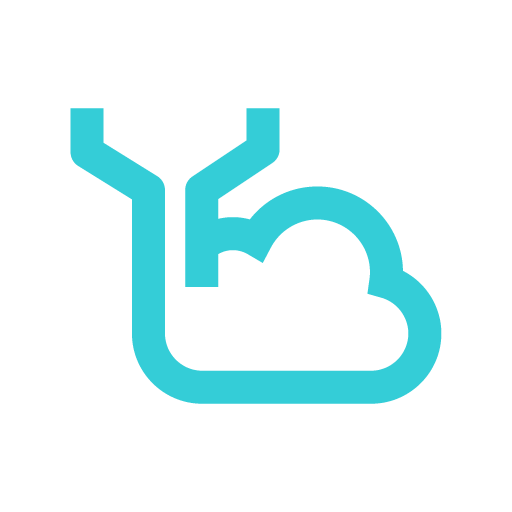
SORACOM Funnel (Funnel) is an adapter that transfers data from the device directly to a specific cloud service.
4. Soracom Lagoon
SORACOM Lagoon (below, Lagoon) is an easy to design personalized dashboarding tool utilizing data collected with SORACOM Harvest services. You can create, publish and share the read only dashboard with third party viewers.
5. AWS IoT Core
AWS IoT Core is a managed cloud service that lets connected devices easily and securely interact with cloud applications and other devices. AWS IoT Core can support billions of devices and trillions of messages, and can process and route those messages to AWS endpoints and to other devices reliably and securely. With AWS IoT Core, your applications can keep track of and communicate with all your devices, all the time, even when they aren’t connected.
So, now that we are aware of the components used in this project, lets get started with the project itself. First, we will setup the Soracom starter kit.
Complete Starter Kit Setup
There is an in-depth documentation for each of the services and starter kits provided by Soracom, which makes our task a lot easier.
So, it setup the Raspberry Pi Starter kit, just follow the link below, where you will find a step by step guide to get started with the kit, which includes setting up the modem and running 2 basic sketches to get to know more about the functionalities of Soracom Harvest. So, here's the link :
Starter Kit SetupNow, after this is done, next step is to go through the ultrasonic_harvest.py file, that you downloaded in the last step of the tutorial. We will use this piece of code as the base to develop our own code, which is given in my git repository for this project.Soracom Console and AWS IoT Core Setup
Now, we will setup the AWS IoT and Soracom console for this project. So, follow the given steps for the setup of Soracom Console first :
1. Soracom Console Setup Now, we will create a group for our project, so first select your sim from the menu and from the actions tab, select change group.
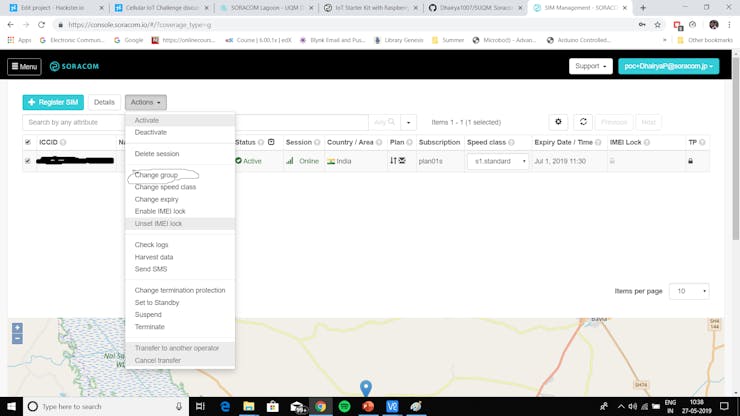
 Its easy to setup Harvest, which was already covered in the tutorial. Now, to setup Harvest with the AWS IoT core, follow this tutorial, which gives a step by step guide to do so. Please note that we are not using the Amazon SNS (Simple Notification Service) for this project, so feel free to skip that step.
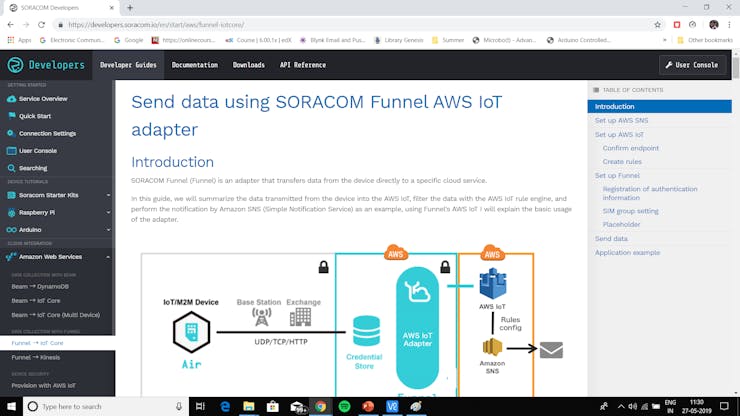 Now, after all of this is done, the next step is to setup Soracom Lagoon, which we will be using for data visualization purpose (on a PC or Laptop screen). So firstly, from the homepage of the console, tap on the menu tab situated on the top left corner, and search for Soracom Lagoon on press on it.
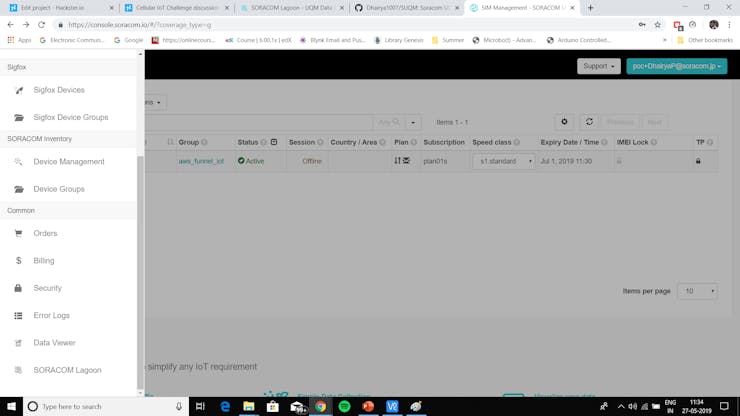
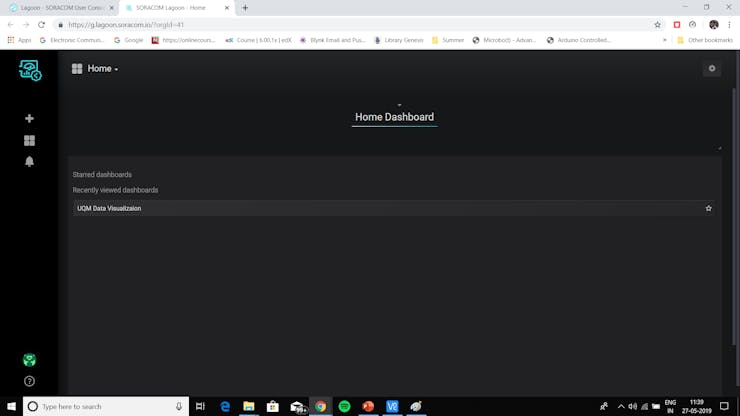
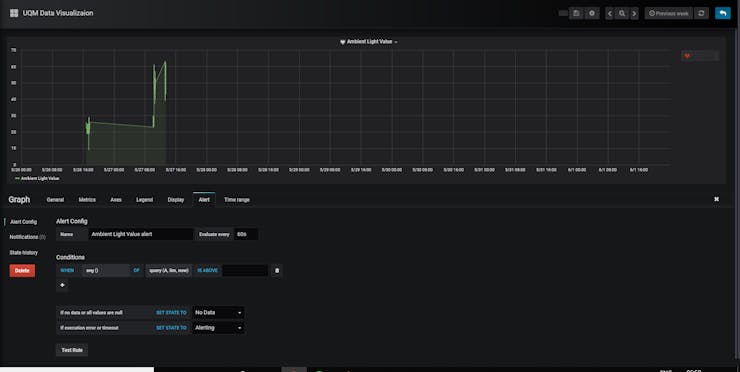
 Now, to set this, first go to the Lagoon console and select any of the graphs. Now from the drop-down, press the edit button.
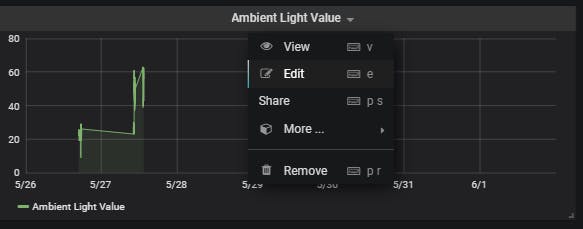
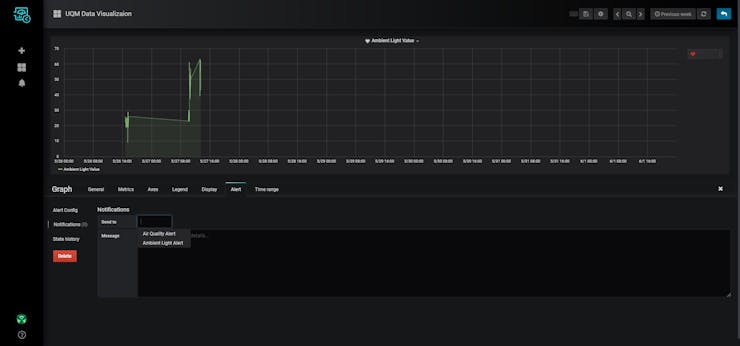
 Now, we have to attach a notification to this alert. But to do so, we first need to create a new notification channel. So, from the leftmost menu, go to the alerting tab and select the notification channels tab.
  Now, create a new channel by pressing on the green new channel button.
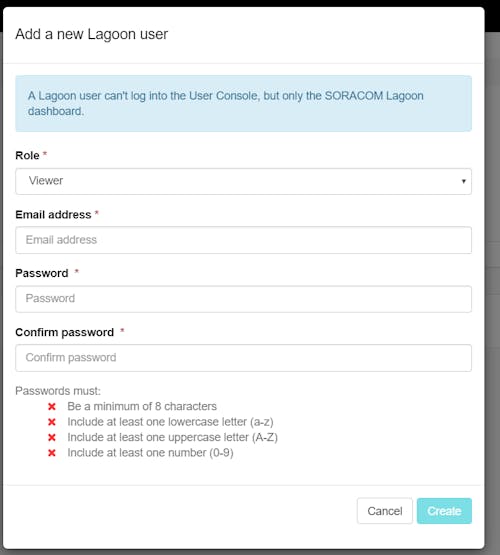
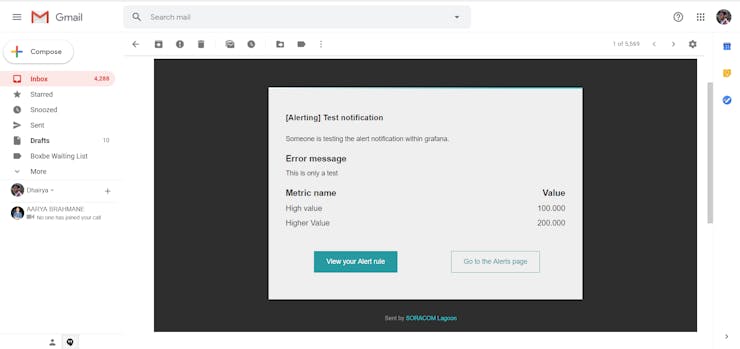
 Fill all the required details and select your desired Notification source. I have used email for this purpose.
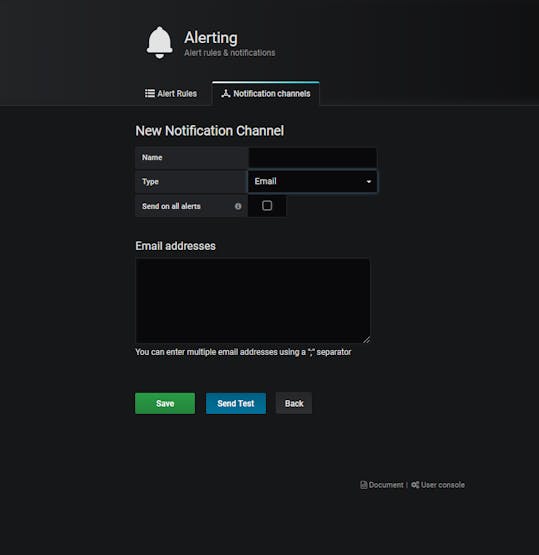
Now, we will move to the AWS side of the setup.
2. AWS IoT Core SetupNow, to setup the AWS IoT core, we will be following the given steps :

 Now, to setup this for our project, just follow this tutorial, which would be already done if you followed it wisely while setting up soracom funnel. After that, you will be ready to carry on with the project.
 Hardware Code Explanation
We will break the python code into small snippets to understand it more easily and efficiently. So, the first snippet is :
# Import required libraries, including python-requests import sys, time, requests, json import pygatt import geocoder import structSo, these are the required libraries, which need to be imported. The pip commands to download them are :
#sys, time and json are inbuilt python libraries #use sudo if you face problems pip install python-requests #The requests library pip install pygatt #Python Module for Bluetooth LE Generic Attribute Profile (GATT). pip install struct #available in python 3.x,used for packing and unpacking byte array pip install geocoder #Library to obtain Location data from internetThe pygatt library is used to fetch the Rapid IoT kit data via Bluetooth, which is obtained in byte array format. So, we require the struct library to unpack and convert this data to normal ASCII data.
Now, moving on to next part :
BLE_ADDRESS = '00:60:37:0A:06:2F' #NXP device mac address adapter = pygatt.GATTToolBackend() #bluetooth adapter creation locate = geocoder.ip('me') #obtain location data from internet locate1 = locate.latlng #latitude and longitude data print "Starting sensor value measurement! Press Ctrl+C to stop this script." time.sleep(1) adapter.start() #Starting the BLE Adapter device = adapter.connect("00:60:37:0A:06:2F") #connect to the Rapid IoT prototying kitThis snippet can be easily understood by the comments itself, so we move on to the next part :
while True: #Loop to continuously fetch the vallues # Value fetching, can be done with a loop too but I did this for easy interpretation light_initial = device.char_read("1493dd8e-8c3e-4e79-a4ff-6f0cd50005f9") #Ambient Light Value in bytearray temp_initial = device.char_read("1493dd8e-8c3e-4e76-a4ff-6f0cd50005f9") #Temperature Value in bytearray humidity_initial = device.char_read("1493dd8e-8c3e-4e77-a4ff-6f0cd50005f9") #Humidity Value in bytearray air_initial = device.char_read("1493dd8e-8c3e-4e75-a4ff-6f0cd50005f9") #Air Quality Value in bytearray pressure_initial = device.char_read("1493dd8e-8c3e-4e78-a4ff-6f0cd50005f9") #Pressure Value in bytearray battery_initial = device.char_read("964bf77c-9f4d-4b27-9340-7eb81c1dfbd5") #Battery Level value in bytearray state_initial = device.char_read("964bf77c-9f4d-4b27-9340-7eb81c1dfbd6") #Charging state value in bytearray # Location information lat = locate1[0] lon = locate1[1] #converting bytearray to normal value and accessing the actual value(in Tuple) light_value = struct.unpack('i',light_initial) light_value1 = light_value[0] temp_value = struct.unpack('f',temp_initial) temp_value1 = temp_value[0] temp_value1 = round(temp_value1, 2) humidity_value = struct.unpack('f',humidity_initial) humidity_value1 = humidity_value[0] humidity_value1 = round(humidity_value1, 2) air_value = struct.unpack('i',air_initial) air_value1 = air_value[0] pressure_value = struct.unpack('i',pressure_initial) pressure_value1 = pressure_value[0] This code snippet fetches the sensor data from the rapid iot kit in byte array format, and after that it converts it to normal readable string format by unpacking this data using the struct.unpack command.After this, the next part of the code is :
if True: print "--------UQM - The Urban Quality Monitoring Device---------------" print "--------------- Rapid IoT Sensor Values-------------------------" print "Ambient Light Value:"+str(light_value1) print "Temperature Light Value:"+str(temp_value1) print "Humidity Value:"+str(humidity_value1) print "Air Quality Value(TVOC):"+str(air_value1) print "Pressure Value:"+str(pressure_value1) print "----------------------------------------------------------------"This code simple prints the obtained values in the python shell. Next,
# Set the HTTP request header and payload content headers = {"Content-Type": "application/json"} payload = { "Ambient Light Value": light_value1, "Temperature" : temp_value1, "Humidity" : humidity_value1, "Air Quallity(ppm)" : air_value1, "Pressure" : pressure_value1, "coordinates" : { "Latitude" : lat, "Longitude" : lon } } # Send the HTTP request to Harvest print "Sending data %s to Funnel..." % (json.dumps(payload))Now, this code converts the sensor data into json format, as we require to send the data in this format only, RAW format is not accepted. After this, the next step will be to send this data, which is done by the following code snippet :
try: response = requests.post("http://unified.soracom.io", data=json.dumps(payload), headers=headers, timeout=5) except requests.exceptions.ConnectTimeout: print "Error: Connection timeout. Is the modem connected?" # Display HTTP request response if response.status_code == 201: print "Response 201: Success!" elif response.status_code == 400: print "Error 400: Harvest did not accept the data. Is Harvest enabled?" time.sleep(3)Note that we send it to the unified endpoint provided by soracom, which sends the data to Harvest, Funnel and Beam at once by default. We are only using the Funnel and Harvest services for this project.
This concludes the code explanation, now we move on to the Android application part, which is the final part of our project.
Android Application Part
The Dashboard and Web Setup are done, but in real time applications, the target are always the end users. It would be quite tedious to open the Lagoon Dashboard all the time on a PC or Laptop as interactive visualization is not possible in mobile websites. So, what's the solution?This!, we will setup an android application which will act as a mqtt client and receive the data sent to AWS by Soracom funnel. For now, we will just display the raw message in json format, but it is completely possible to use interactive android tools to visualize this data. So, lets move on with the guide. I would like to thank Felipe Ramos Da Silva for assisting me with this wonderful tutorial. In this guide we will use an already developed android app in a git repository provided by me in the below repository, so we will delve into this project explaining each part, and how we can prepare the app for be used. The repository can be found on AndroidPubSubWebSocket repository.
FirstStepsSo, first clone the provided repository link, and be sure that you have an AWS account to settle up all the configuration on cloud-side. So, let's work first in the Amazon services and set all our cloud environment, and further we go to android project to make it work.
https://github.com/Dhairya1007/SUQMAWS SideIAM RolesIn the AWS side, there are two main steps to be followed, first we will have to create some roles on IAM (Identity Access Management), that allows you to securely manage access to AWS services and resources. As in this app we will not use any kind of authentication, we have to create this role to specify to AWS that some devices can use services without being authenticated. Although, this is a theory and educational guide, it's not recommended to enable unauthenticated devices to use the services of your AWS account.
So, in your AWS console, go to Cognito -> Manage Identity Pools -> Federated Identities -> Create new identity pools: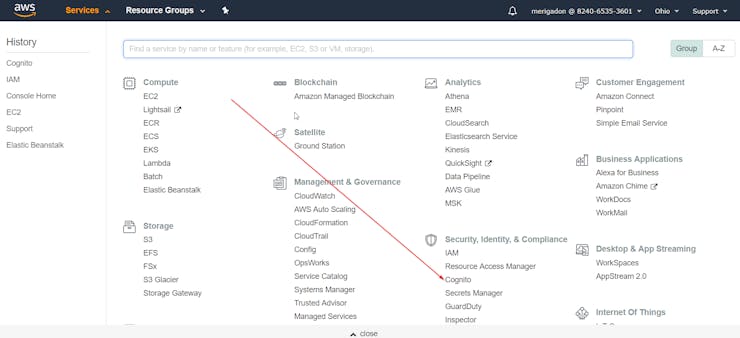 Where you will be creating a federated identity pool to give access to your unauthenticated devices, and now you can give a name to the pool and select the option: Enable access to unauthenticated identities.
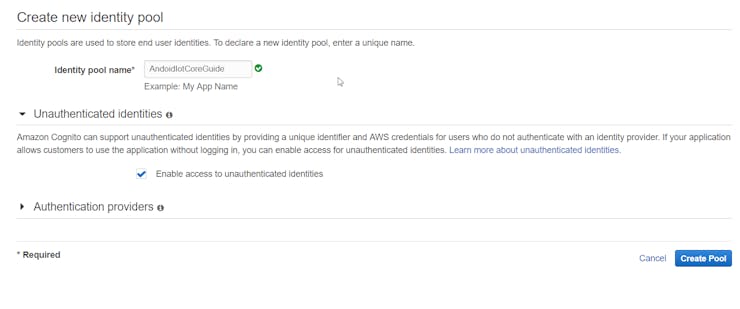 Once you have done, when creating the pool the console will request you to create two new roles on IAM, create these roles and go to IAM -> Roles and select the roles that you have created.
In the role menu that you have created, you will have to attach a policy giving some permissions to this role. Further, in the existing roles search for the AWSIoTFullAccess and attach it.

Now we are good to go to AWS IoT Core, but don't forget to note the Cognito Pool Id of the federated identity pool that you have created, we will use in the android app to provide the authentication path to the application.
Access IoT Core on the AWS ConsoleIn order to make your first IoT device in AWS services, you will have to go to:

As some basic things has to be updated than follow my next guide that will help you how to create a Thing, and what are the ARN, EndPoint, and shadow on IoT Core console.
Create a Thing on IoT Core ConsoleNow that you have accessed the IoT Core console, on the sidebar go to Manage -> Things, and on the right corner just hit create.
After this select the option Create a Single Thing, and as we are doing this guide only for learning purposes, just give a name to the device, and don't change any other option, and even don't create a certificate at this time.
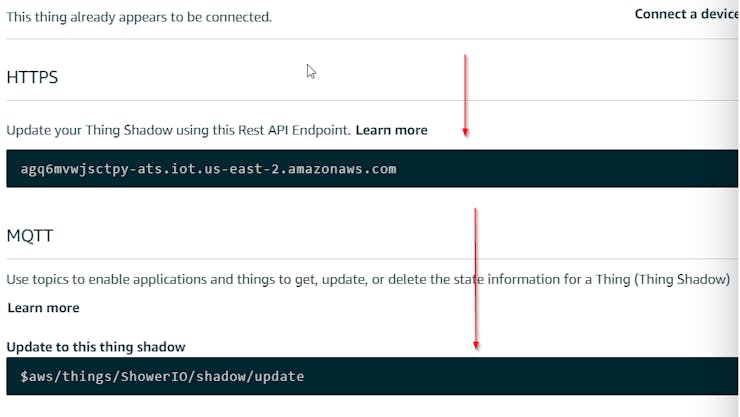
So, after the device is created you can go into device's options, and among a lot of options here, we will have two of them that it's important for us at this time.
Take note of the device endpoint and the update shadow topic, like the next image:
 Android SideThe android app only have the AWS SDK package as dependency, if you are using Android Stuido, it will download automatically for you when you import the project in your IDE, but if you are using Eclipse, you will have to download you will need to download the AWS SDK for Android (http://aws.amazon.com/mobile/sdk/) and extract and copy these jars into the 'libs' directory for the project.LayoutAs this is a simply project, it has only a layout xml file, and an activity. In the layout file (activity_main.xml) you will not have to change anything, unless you would like to change the actual GUI of the main activity. Summarizing, this layout is only some buttons and edit texts that will handle the subscribed MQTT topic, or publish a message, where each of them has an id to be bonded with some object in the main activity class. Although, this project is binding view elements in the common and tiring way, you should take a look at Butter Knife, a view binding method that makes the binding more easier and faster, turning your code more readable and clean.See the Layout file by downloading the below repository, and opening the android application folder in Android Studio.
Now, lets move to the Main Activity of the the application.
ActivityIn the main activity, there are some variables to be changed, they are:
- The endpoint of your AWS IoT Core created thing. - Is the Id of the Cognito Identity Pool that you have created. - Your Thing was created in some of the AWS availability zones, please note where you've created it.This java code is very simple and can be extended for many IoT android projects, firstly in the onCreate method all the view elements will be bound with the attributes of the activity java class, and two important classes for our project will be instantiated.CognitoCachingCredentialsProvider - That's the class from AWS SDK that will grant access to all your unauthenticated devices, if the cognito id was passed correct, and region a token will be given to the device.AWSIotMqttManager - The MQTT manager that will handle all the connections, and if the access to AWS services is granted by CognitoCachingCredentialsProvider, the connect method will be called, passing a callback that monitors the status change of the connection. Note that on this part of the code the process when the status change will not block the UI, so it can be ran on UI Thread.Also onCreate method the buttons for subscribing and publishing a topic will be assigned to a callback, to trigger the events:subscribeClick - When the subscribe button is pressed, a topic will be subscribed and a callback for new arriving messages will be created. Now you can receive messages from other devices!publishClick - When this button is pressed, the message will be published on the correspondent topic.disconnectClick - To disconnect from your endpoint, and connect in another.The activity code can be seen in the application source code which is included in my git repository for this project.
So run the code, and if everything goes well, you will now have a simply way to establish communication between your Hardware and the android application, which was the aim of this project. The final application screen will look something like this :
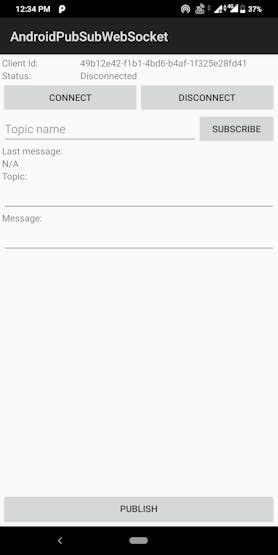
The above shown application was just an simple example that demonstrates how can we get our AWS data on Android in real-time. But, unlike the raw message we obtain in this app in JSON format, we can easily parse this data to get intense visualization tools in android like graphs, charts, etc. Firstly, we have to parse the raw JSON data, which can easily be learnt by this tutorial I found on google :
https://abhiandroid.com/programming/json#JSON_Parsing_In_AndroidNow, for visualization purpose, we can use the AnyChart-Android library or package. The whole package is opensource and its Github link is as follows:
https://github.com/AnyChart/AnyChart-AndroidThis way, we can make our application more interactive and user friendly easily. I haven't attempted it because of my lack of proficiency in Android and Java programming.
So, now all the things are completed and our project is ready for testing. So, lets discuss some points which will inform us how this prototype can successfully be implemented as a product, under the topic : Architectural and Operational Excellence.Architectural and Operational Excellence
This is a special section in which I would like to point out some points regarding the topic - prototyping to production for this product.
1. Raspberry Pi Zero : INR 1200 Approx (17 USD)
2. Rapid IoT Kit : INR 3500 Approx (50 USD)
3. Power Brick : INR 1000 Approx (15 USD)
4. Any USB Modem : INR 1500 Approx (20 USD)
4. Software Side and the Soracom AIR SIM costs : 50 USD given to us
So, after the above breakup, its quite clear that the cost per device is very high. But this project has the potential to go into development. The cost per device can be easily cut by :1. Firstly, using normal sensors instead of these nodes will be way cheaper.
2. As we are just working with HTTP and MQTT requests, we can replae the pi with a much cheaper ArduinoArduinoPi which is around 15 dollars, or even better an esp8266 based NodeMCU with a cheap GSM module, which are available for around 10 dollars, and they would be even cheaper when bought in bulk. Or simply, we can get the Pi Zero's at a much cheaper rate in bulk. 3. As for the power bricks, we can get some normal quality power bricks at a much lower cost when bought in bulk.Now, this project makes sense when we can have a large number of nodes fitted all around the city area for efficient monitoring. The good thing about cellular connection is that we can also obtain the precise location of our device, so if any one of our node fails, the system can easily send a notification (using AWS's SNS service) along with the location for timely action. Even remote troubleshooting is possible, like rebooting the Device just by sending an SMS.Now, comes the main question of security. Firstly, we are using MQTT for this project, which is one of the most secure networking protocols. Moreover, we have the security of AWS, which though not used for this prototype(I have used unauthenticated access), can be easily implemented when this goes to a product stage. In addition to that, we can setup anti-theft alarms or measures to keep the device hardware safe from humans and animals. For instance, of we consider this prototype, the rapid iot kit has an on-chip accelarometer, so we can detect most minor motions and generate actions like a buzzer or notifications based on that. So, Security can be efficiently handled.AWS and SoracomConsole bothhave a very well setup system when it comes to credentials and configurations. Both provide unique credentials to each device connected to it, and we can connect 2 different nodes too via AWS IoT and at the same time maintain its uniqueness. Moreover, when it comes to android application part, each node will have a unique operator id, as it will be shown in the demo below. So, we can have an option to view individual Node's data, or an aggregate data of a number of nodes in the app too. Each app will also have an unique client id, so their tracking and monitoring is also efficiently handled.Hence, this project has the potential to be a successful product, as the monitoring of certain urban areas is of the utmost importance. It wouldn't be wrong to say, a matter of life and death! We can solve a lot of problems if this is implemented on a large scale, which include Air Quality control, Global Warming, etc. Notification Feature Feature using Amazon SNS
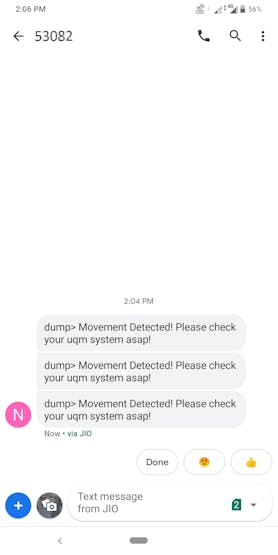
Now that everything is done, we can add some additional features, some of which are mentioned above. For instance, as discussed in the above section, we can add a security feature which sends a SMS some movement is detected in Hardware, which can be due to an animal or any other reason.
It is very easy to do so with the help of Amazon SNS, which is a simple notification service provided on AWS. So, let's start with the setup, which is pretty easy and can be setup using the python code. Firstly, we will require the following AWS credentials for setup:
#Required AWS Credentials AWS_ACCESS_KEY = '' AWS_SECRET_ACCESS = '' TOPIC_ARN = 'arn:aws:sns:region:AWS_account_no.:datadump' So, after this is done, we will require the python library boto3, we will initialize the SNS client. The code to this is:snsClient = boto3.client( 'sns', aws_access_key_id=AWS_ACCESS_KEY, aws_secret_access_key=AWS_SECRET_ACCESS, region_name='your aws region' )After this is done, you just require a publish message function, which will use this client to publish our message, i.e. send it to the specified target in AWS, it can be and email or a mobile number. The publish function will be as follows:
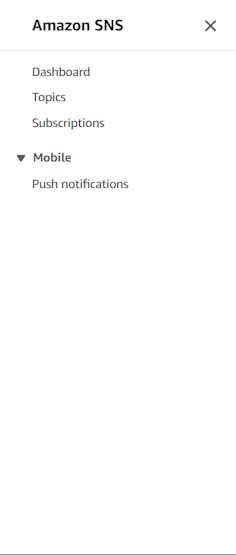
def publish(snsClient, message): response = snsClient.publish(TopicArn = TOPIC_ARN, Message = message, Subject = '24/7 Housesitter') print("Published with id %s " % response)This completes our code task. Now, before moving to the AWS SNS part, we will have a look at a First, open the AWS SNS from your AWS console.
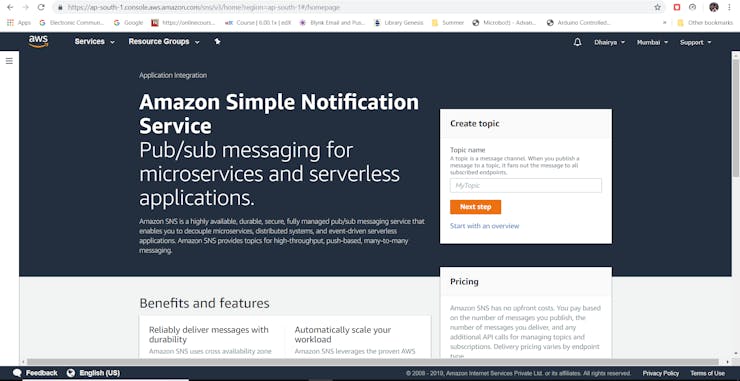
After this, go to subscription tab to setup an email for receiving notification and the push notification tab under the Mobile tab for Mobile SMS notifications.
After that, just follow the steps which the tutorial on the site shows and you will be ready to send the notifications to any platform you like.
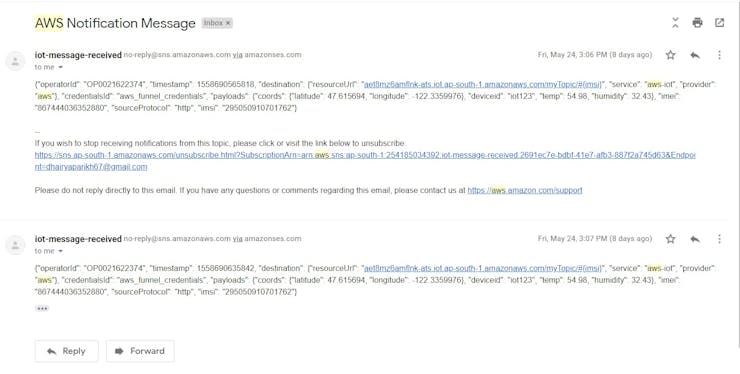
So, this concluded our notification part. Sample messages look something like this:
Encasing for this Project
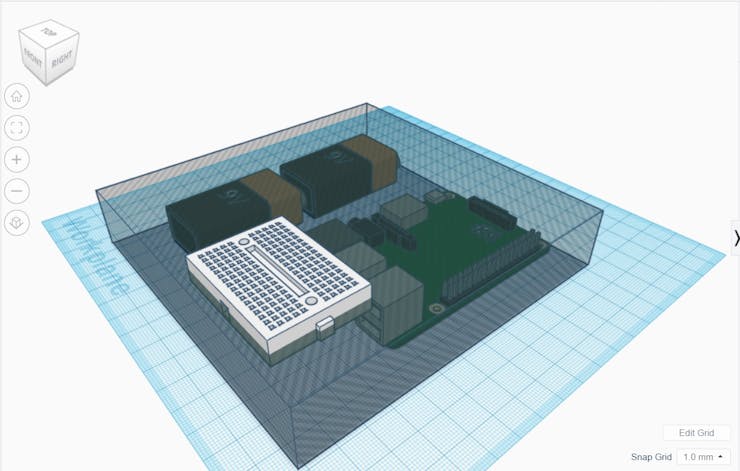
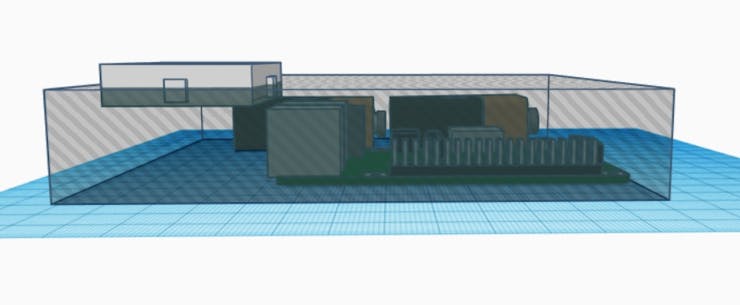
Now that we have everything set up as expected, we can move on to the encasing part of the project as it also carries a major part of the total cost when it comes to cost of designing it and also for the reliability of the system as a whole.
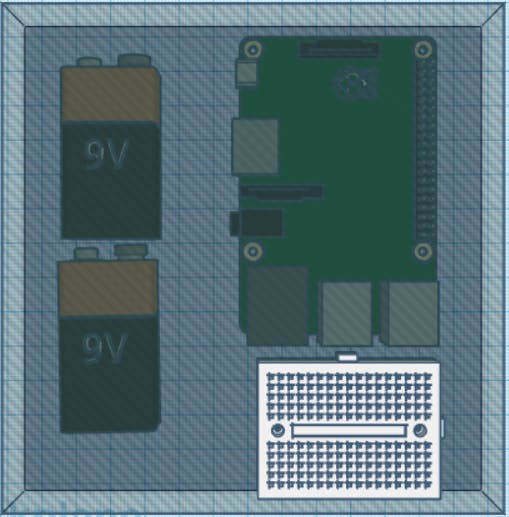
I have attached an STL file with a very basic 3D model of a rectangular encasing, but please take a note that :So, this provides us with a robust low cost encasing for our project. The final encasing looks something like this:
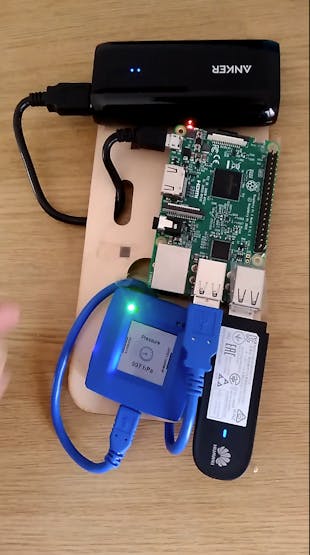
For now, I have stuck to a simple demonstration of the project. For this, I have used a thin wooden plate on which I have setup my whole Hardware. The final system looks something like this:
Now, at last have a look at the video demonstration of the project.
Video Demonstration
Here is the video of my working project prototype. I have used a Raspberry Pi 3B for this demonstration because I was facing problems in SSHing into my Pi zero. But the process remains the same no matter which Pi you use. Note that Pi Zero will be a little slower because of a low configuration processing chip.
So, this was it for this project. If you like my work, please follow me and like this project.
Future Plans
This is just the first step taken into the world of urban quality monitoring. This project is just the starting. My plans for the future are:
1. To develop a low cost device which can act as a sensor node, for which I aim to use the Pi zero and Soracom connectivity as stated above.2. To develop a network of such nodes, so that we can get plenty of data points, which gives us sufficient data to visualize on advanced tools like Heat Maps.3. One of the major things to work in the future is the security for this system. This can be easily achieved by a more in-depth study into the features of AWS Security protocols and credentials.Vote of Thanks
I would like to thank Soracom and Hackster for this wonderful contest. I would like to thank Soracom for providing us with such wonderful Hardware and Developer support too, which includes the in-depth Documentation and constant support through the Discussion tab of the contest.
I would like to thank Hackster for providing to all this great platform, where in such great companies host their contest, and we get to interact with people from all around the world and share such innovative projects.