
Soracom Powered GNSS Tracker
A Soracom GNSS tracker with motion detection, data visualization, and rule-based alerts.
Things used in this project
Hardware components

|
Inertial Measurement Unit (IMU) (6 deg of freedom) | × 1 |

|
Wio LTE EU Version - 4G, Cat.1, GNSS, Espruino Compatible | × 1 |
Software apps and online services

|
AWS IoT | × 1 |

|
AWS Lambda | × 1 |

|
AWS SNS | × 1 |
|
|
AWS Quicksight | × 1 |

|
AWS Kinesis | × 1 |

|
AWS S3 | × 1 |

|
Arduino IDE | × 1 |

|
SORACOM Air IoT Connectivity Platform | × 1 |

|
SORACOM Harvest | × 1 |

|
SORACOM Lagoon | × 1 |

|
SORACOM Funnel | × 1 |

|
SORACOM Beam - Data Transfer Support | × 1 |
Hand tools and fabrication machines

|
Hot glue gun (generic) | × 1 |

|
Soldering iron (generic) | × 1 |

|
3D Printer (generic) | × 1 |
Story
Intro & Overview
In this project I will present the build of the Soracom GNSS Tracker, a proof of concept of a multi-purpose location tracking device: The device was built using a Seeed Wio LTE with a Soracom AIR SIM card.It has the following features:LTE / 3G connectivity - using SORACOM AIRGNSS-based location tracking - GPS, Beidou, GLONSS and Galileo are supportedMotion detection - using the accelerometerCloud-based data visualization and analysis - visualize location / environmental data in a web interfaceRule-based notifications - define rules and receive email / SMS / push notification when the rule is breachedFall detector - using the accelerometer detect when a people fall, and call for help automaticallyThe GNSS Tracker could be used for many different use cases:Bicycle anti-theft protection - when the bicycle is parked the motion detection would activated from the smartphone application. On motion the device will automatically activate the location tracking and the user will receive a notification. The location could be visualized in real-time in the mobile application.Trekking monitoring - monitor bicycle trips / hikes. Data like location, altitude and temperature could be tracked an visualized in a mobile app and shared in a web interfaceVehicle fleet monitoring - monitor a fleet vehicle. On a big fleet AI could be also use to detect anomalies.Virtual Fence - ensure a device / good remains in a predefined area. The allowed area could be set in a web interface, and the owner would receive notification if the good left the allowed area. Could be useful in cities for public bike / electric scooter fleets, Project Structure:in the section we will take a look on the hardware used in this project.the section explains how to explore the hardware using Arduino-based softwarein the next two sections and we will try to find out what solutions the two platforms offers for the different uses casesthe final section we will see what it would take to transform this PoC project into a real product
 Hardware
The main components used in this project will be: (EU version)- it is a STM32-based board with LTE / 3G connectivity and GNSS support. It can be programmed in Arduino and supports standard 4 pin Grove sensors. it comes with two LTE / 3G antennas, a GNSS antenna and a Lithium battery:
 Soracom AIR SIM card - provides access to the LTE / 3G networks, and as well to the Soracom Cloud services
 MPU-6050 Accelerometer / Gyroscope - an accelerometer + gyroscope sensor will used to implement motion detection.There are multiple sensors that could be used. Basically, any I2C capable sensor should work. The most easier would be to use a , as this requires no soldering.I had a GY-521 module laying around, so I used that. The GY-521 is a module featuring the MPU-60506-axis accelerometer / gyroscope sensor.
 We will connect the sensor to the I2C port of the Wio LTE. I used a Grove sensor cable with one of the connectors cut off and with the cables soldered to the appropriate pins of the GY-521 module. We need to used the first 4 pins(VCC, GND, SCL, SDA) of the module.
> a 3D Printed Enclosure
The Wio LTE with antennas and sensors hanging tends to get a little bit messy: so I decided to design and 3D print an enclosure.I used FreeCad (and Blender) to design the enclosure. First I modeled each component and created an assembly:


 Then I modeled the enclosure, basically by cutting out the assembly from a solid block and adding some design features in Blender.
 I also created rotating supports for the two LTE antennas:
 It enclosure and the antenna support was printed on a Tevo Tarantula 3D printer:
 Assembly:
 Note: the FreeCAD and STL files can be found in the GitHub repository.
Software: Arduino IDE
The software running of the Wio LTE was created using Arduino IDE.> Wio LTE: Getting Started
The Seed Wio LTE board can be programmed using Arduino IDE. At the first use we need to do the following steps:add Seeds Board Manager URL from File -> Preferences:https://raw.githubusercontent.com/Seeed-Studio/Seeed_Platform/master/package_seeeduino_boards_index.jsoninstall the Wio Tracker LTE board from Tools -> Boards -> Boards Managerinstall the Wio LTE for Arduino library from Sketch -> Include Library -> Library ManagerAfter this we should have the Wio Tracker LTE board available in the Tools menu, as well a list of examples in the File -> Examples -> Wio LTE for Arudino menu. As a start, we can select the basic -> LedSetRGB one. To upload the sketch:Reset the board while holding the Boot button - this will put the board in Boot / DFU mode. This can be confirmed by looking USB devices name:$ lsusb
...
Bus 003 Device 012: ID 0483:df11 STMicroelectronics STM Device in DFU Mode
hit Upload in the Arduino IDEReset the board again (this time without holding the Boot button)
As a start, we can select the basic -> LedSetRGB one. To upload the sketch:Reset the board while holding the Boot button - this will put the board in Boot / DFU mode. This can be confirmed by looking USB devices name:$ lsusb
...
Bus 003 Device 012: ID 0483:df11 STMicroelectronics STM Device in DFU Mode
hit Upload in the Arduino IDEReset the board again (this time without holding the Boot button)After the upload, the RGB LED should light up and change its color.
> Soracom Examples
The Wio LTE for Arduino library also comes with some examples using Soracom. One of these is the soracom-harvest example, which demonstrates how to upload sensor data to the Soracom Harvest.To run this:
activate your Soracom SIM card at console.soracom.iocreate a new Group, and activate SORACOM Harvest for it assign the Group to your SIMinsert the SIM card into the Wio LTErun the soracom-harvest exampleThe Serial Monitor should show something like this:
 In the Soracom Console, under the Harvest data section we can see the uploaded data:
 There are two more examples available, soracom-funnel and soracom-unified, that demonstrates how to use the Soracom Funnel and Soracom Unified endpoints.
> Wio LTE GNSS Example
Getting the GNSS work on the Wio LTE was a little bit trickier.Look like there are two Arduino libraries available for the Wio LTE:SeeedJP / WioLTEforArduinoSeeed-Studio / Wio_LTE_Arduino_LibraryThe first is maintained by Seeed Japan and has support for Soracom, but the GNSS functionality was missing (issue #24). The second one is maintained by Seeed Global and has support for GNSS, but not for Soracom.As both Soracom and GNSS functionality is needed for this project, I decided to port the GNSS functionality to the JP library. The code can be found in my bluetiger9/WioLTEforArduino repository. I also submitted a pull request (#25) to the main repository.The GNSS functionality can be tried out by using thegnss -> GetGNSSLocation example: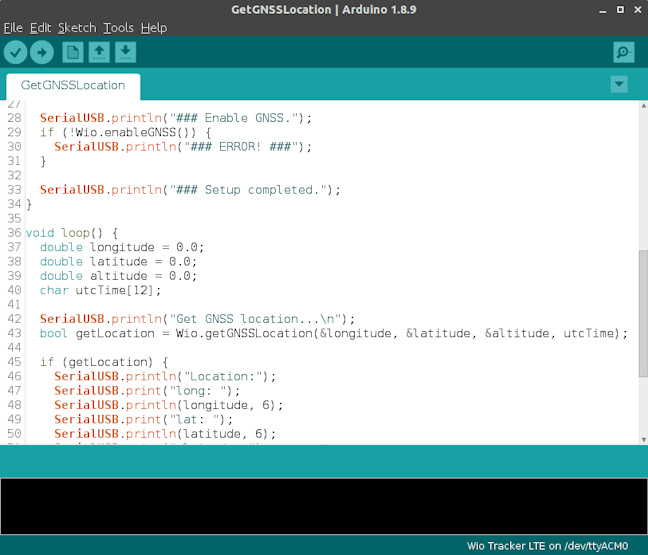 The GNSS functionality is initialized by
 Wio.enableGNSS() method.The location (longitude + latitude), altitude and UTC time can be obtained using the Wio.getGNSSLocation() method. The first few calls until the satellites are locked are expected to fail.The example should output something like this:

> Accelerometer and Gyroscope
The Arduino sketch I used is based on the How to use the accelerometer- gyroscope GY-521 article. It needed some small changes. See the example sketch in the attachments.If we did everything right we should be something like this:

> Putting things together
As we have all the components working, we can create the final sketch by combining the code from example sketches:Thesetup() function initializes all the needed components:// Setup
void setup() {
setupSerialUSB();
setupWioLTE();
setupGNSS();
setupAccelerometer();
setupSoracom();
SerialUSB.println("### Setup completed.");
}
The loop() function reads the GNSS location, the acceleration data and sends it to the Soracom Unified endpoint:// the loop function runs over and over again forever
void loop() {
// GNSS
double longitude, latitude, altitude;
struct tm utc;
if (!getGNSSLocation(longitude, latitude, altitude, utc)) {
delay(1000);
return;
}
// Accelerometer
int16_t AcX, AcY, AcZ, Tmp, GyX, GyY, GyZ;
if (!getAccelerometerData(AcX, AcY, AcZ, Tmp, GyX, GyY, GyZ)) {
delay(1000);
return;
}
// Soracom
char data[1024];
sprintf(data,
"{\"lat\":%.6f,\"lng\":%.6f, \"alt\":%.6f, \"acX\":%d, \"acY\":%d, \"acZ\":%d, \"temp\": %d, \"gyX\":%d, \"gyY\":%d, \"gyZ\":%d}",
latitude, longitude, altitude, AcX, AcY, AcZ, Tmp, GyX, GyY, GyZ);
if (!soracomSend(data)) {
delay(1000);
return;
}
// sleep
delay(10000);
}
Note: the final Arduino Sketch and example sketches can be found in the GitHub repository.SORACOM Cloud
From the Wio LTE the data arrives in the Soracom Unified Endpoint.Here, in Soracom's cloud we can multiple services available which can be used to store, visualize or forward the data to an another IoT service provider.The services we will use are the Soracom Harvest and Lagoon for data store, visualization and alerts, and Soracom Funnel and Beam for the connectivity with AWS IoT
> Soracom Harvest
Harvest is probably the easiest way to get started with IoT devepment with Soracom devices. It enables easy collection, storage and visualization of the data sent by Soracom devices.
The Soracom Harvest can be enabled from the Group's settings page: Then, from the Soracom devices we can send data to the listed entry points. The uploaded data is automatically persisted in the Soracom Harvest.The data can be viewed from the User Console, but selecting a SIM a choosing the Harvest data option from the right click menu:
 The interface can show booth time series and location data. The bellow example show location data uploaded from the Wio LTE:
> Soracom Lagoon
Lagoon is Soracom's solution for IoT dashboards. It allows creating dashboards showing data uploaded to the Soracom Harvest.
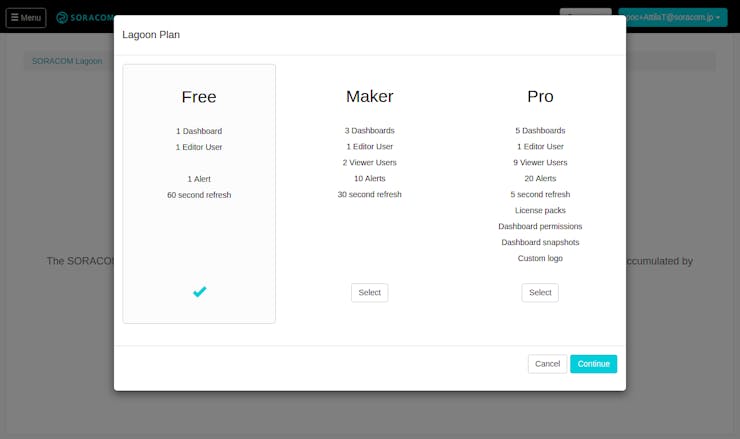
Lagoon can be accessed from the Soracom User Console, from Menu -> Common -> SORACOM Lagoon: From here, we can add a Lagoon subscription to our account. There are 3 plans available: Free, Maker, Pro. I chose the Free plan, as it costs nothing and provides the features I needed.
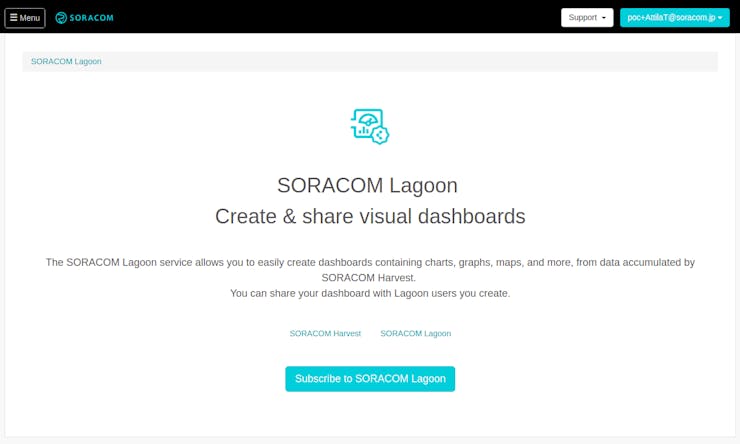

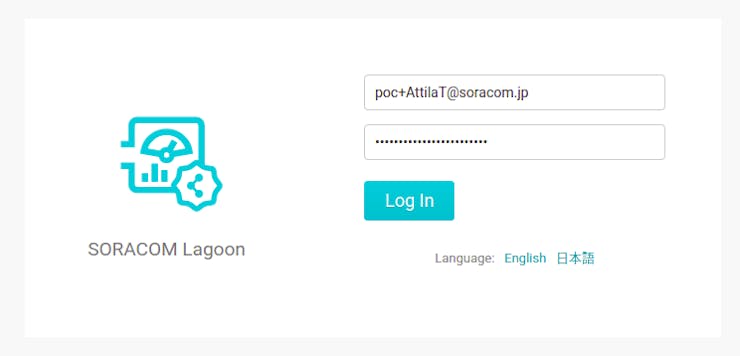 From the Lagoon page, we want to select the SORACOM Lagoon console option. This will take us to a login page, where we can use the same credentials we as for the Soracom console. After a successful login, we will end up on a Lagoon Home Dashboard page:
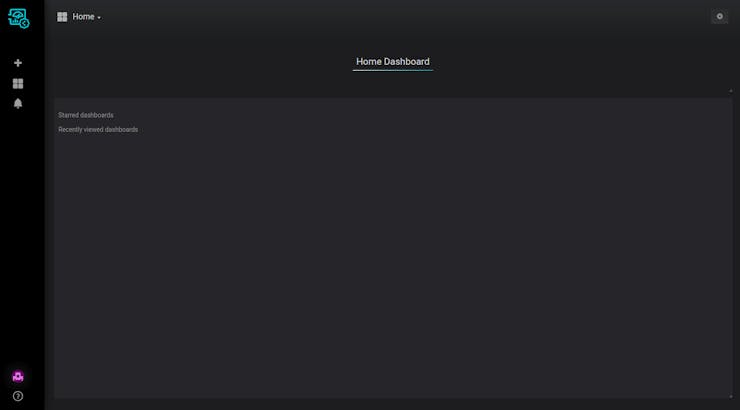 If you ever worked with Grafana, the page may look similar :). Lagoon is based on Grafana, probably the most popular open-source analytics and monitoring platform.Grafana allows quickly creating nice looking dashboards, with data from several data sources and it also support rule-based alerts. With a couple of click with can create dashboards like this:
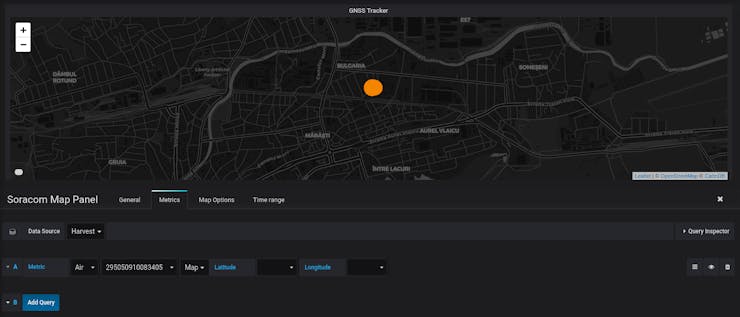
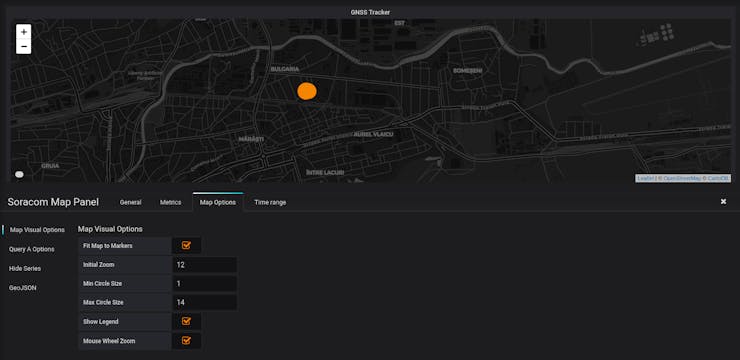
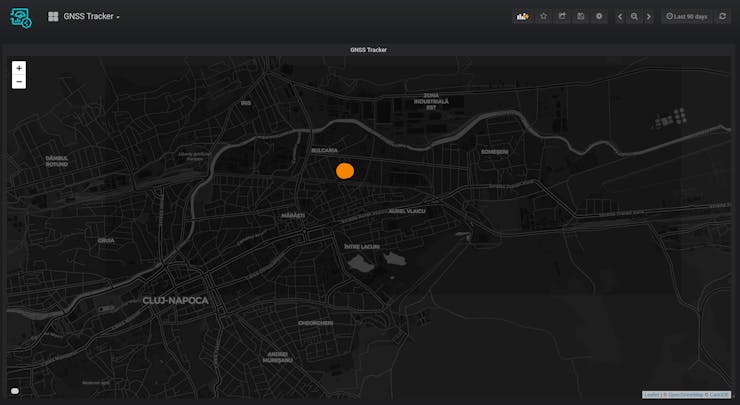 For this, I used a Soracom Map Panel component with the following configuration:
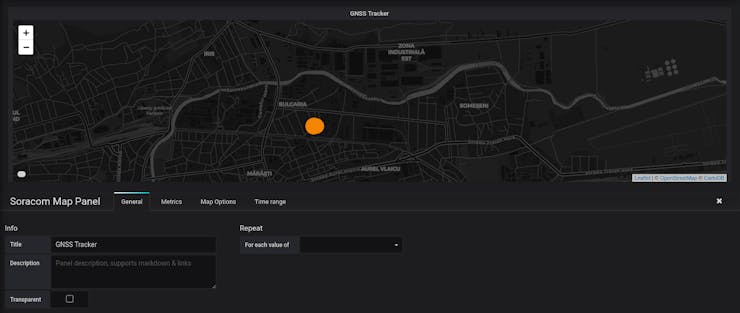
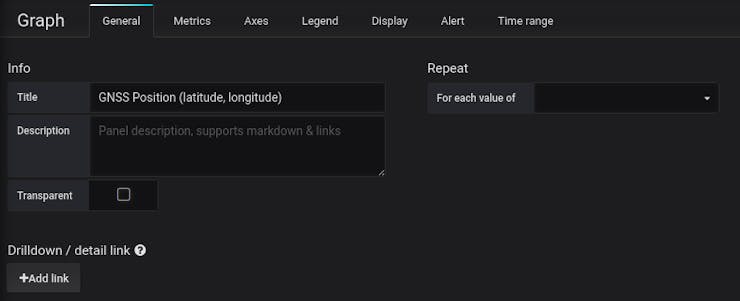
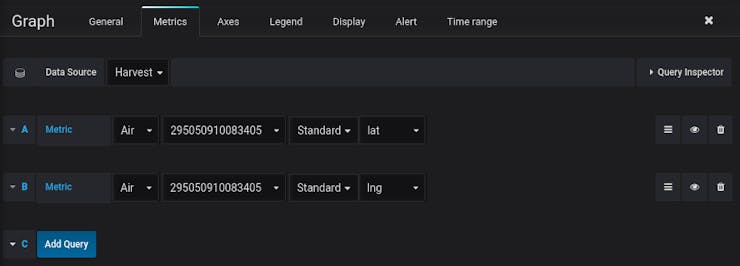
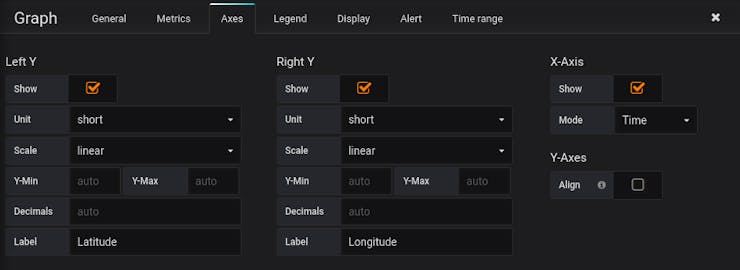
 I mentioned that Grafana / Lagoon supports rule based alerts. Grafana's alerting engine allows attaching alert to the dashboard panels(right now just Graph type panels) and supports sending notifications when the alert is breached.Alerts on location data are a little bit tricky, as we cannot attach alerts to Soracom Map panels. Instead (figured out this from the following YouTube video), we can create a Graph panel showing the longitude and latitude:
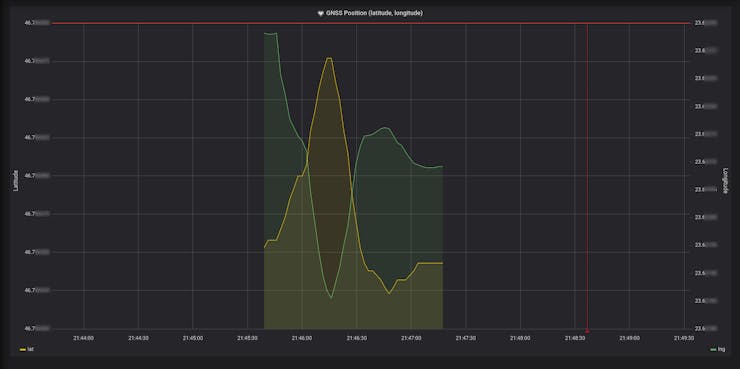
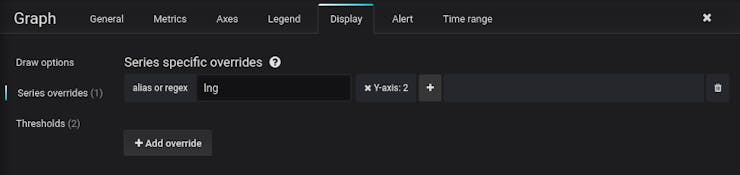 Then we can attach an alert to this panel:
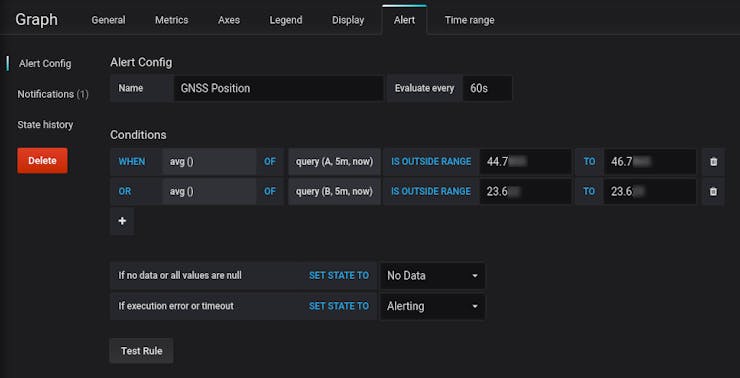 The above alert combines two range conditions, one for the latitude and one for the longitude. So, basically alert will get a breached when tracker gets outside a pre-defined rectangle.To get notifications, we also need to configure a notification channel, for example an email address:
 After this, when the alert rule is breached, we should get email notifications like the one bellow:
 Note: see dashboard JSON in the GitHub repository. This contains all the dashboard, panel and alert configurations.
Amazon Web Services
For more complex IoT applications Amazon Web Services (AWS) may be a better choice. Here we will build our application around AWS IoT Core along with some other AWS services like Lambda, SNS, IoT Analytics and Quicksight.
> AWS IoT: Overview
AWS IoT Core is Amazon's solution for Internet of Things applications. It has several services that covers fields like device management, multi-layer security, data management and visualization and rule based alerts.Things and thing types:In AWS IoT the physical devices are called things. Each thing has a type, storing the common configuration and information about things of the same type. Device Shadow:Each device has a device shadow attached to it. The device shadow is JSON document that stores the device reported and desired states. It can used to control a device, and it can retried even if the device if offline.In our GNSS Tracker application we will thing type called GNSS Tracker, and each individual GNSS Tracker device will have it's own thing. In the device shadow will have:
reported field - GNSS position, accelerometer data and another information received from the device desired field - device configuration like scan rate, motion decetionUsing device shadow over custom MQTT topics has the advantage that we have persistent storage. This means we can access the device's last state or state configuration, even if the device is not currently only.SDK-s,MQTT and HTTP interfaces:To interact AWS IoT we can use either the provided SDK-s, or there are MQTT and HTTPinterfaces available that can be used directly from any client.Security:Each thing will have a X.509 security certificate(private key + signed public key) with a security policy attached to it. The security certificates are used by the psychical IoT things for mutual authentication with the AWS IoT. The security policy governs what we can do with a given certificate.As the device certificates may be stored on the device itself, it is important to have policy that restricts the use of the certificate to a single thing. This way if someone gains access to a device, it can't use the certificate to access information about other devices.(More on why the certificate and security policy is needed: Preparing the Skill to handle multiple Users / IoT things)> AWS IoT: Creating a Thing
To create a thing, first we the thing type(in our case GNSS_Tracker):from , select Manage -> Types and press the Create buttoncomplete the Name and Description fieldsadd searchable attribute namedsoracom_imsi - this will be used IMSI number of the Soracom SIM card, and will be used to lookup the thing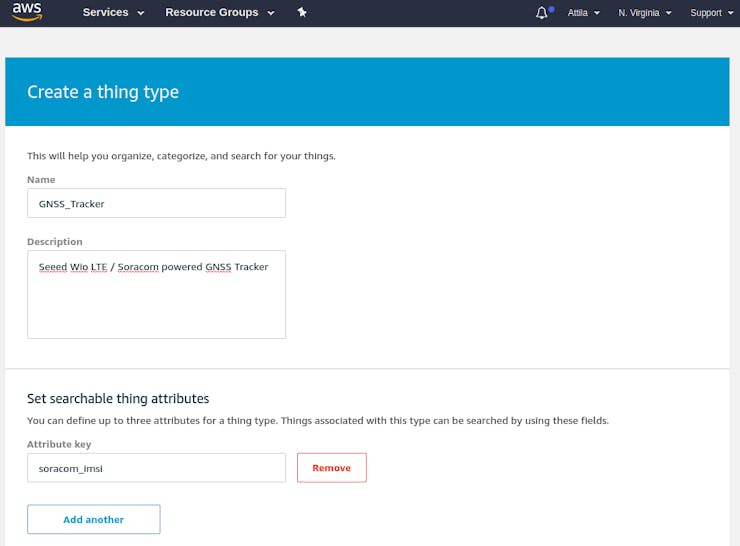 Next we can create the thing:from , select Manage -> Things and press the Create buttonin the 1st page, enter a name (
GNSS_Tracker_001) and select the thing type (GNSS_Tracker)the 2nd page will ask you to create the device certificate for the thing - Select the Create certificate option and the public / private keys, and a public certificate signed one of the AWS's root CA-s. Download the generated keys / certificates.in the 3rd page you will need to attach a to the thing's certificate - if you already have a OneUserOneThing policy select it - otherwise, open a new browser tab and follow the next step to see how to create it - click Register Thing, and the thing will be createdto create a OneUserOneThing policy, select Secure -> Policies and use the Create button to create the policy. Select Advanced Mode and use the OneUserOneThing JSON from the attachments


 Now, as we have this
 GNSS Thing created we will take a look on how to access it with a Soracom AIR device.There are basically two ways to connect Soracom Cloud with AWS Iot:Soracom Funnel - automatically forward data to cloud providerSoracom Beam - expose the AWT IoT's MQTT interface, by acting like MQTT proxy> Soracom Connectivity: Funnel
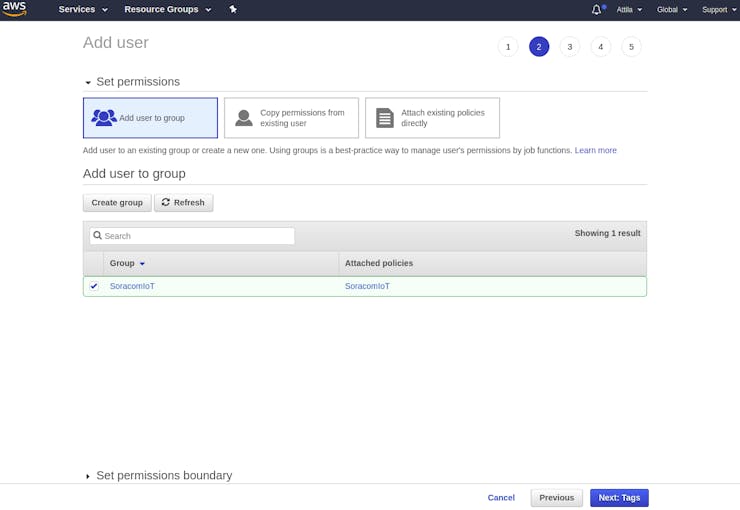
Funnel is Soracom's adapter service that let's you forward sensor data to a external cloud service, like AWS IoT or AWS Kinetis Firehouse.To use Funnel with AWS IoT, first we need to create a service user from AWS IAM:enter the , select Users and click on the Add user buttoncreate an user, with programmatic access a security policy based on theAWS IAM - Soracom service user policy JSON from the attachmentsnote the access key ID and access key secret


 Then in the Soracom User Console, in the Group settings enable on switch and complete the required fields and the AWS service user created above:
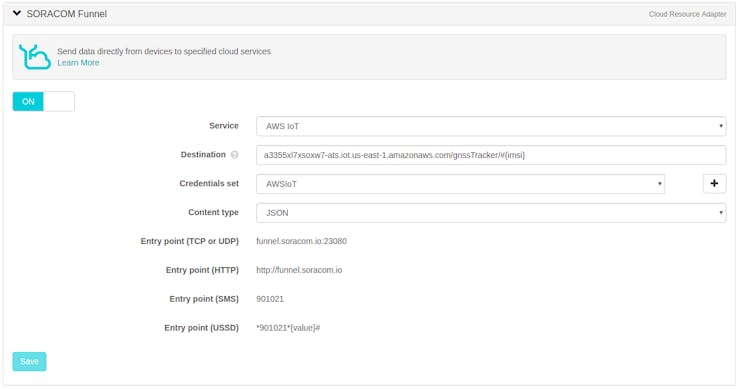
 After this, we should be able to see any data uploaded to the Funnel / Unified endpoints, published to AWS IoT under the
 gnssTracker/#{imsi} topic The data is published in a custom JSON object, so we may want to process it and update the device shadow based on it:send the message to a function for further processing
To do this, we can:
create an that calls a Lambda function at every message received ongnssTracker/#the Lambda function looks up the appropriate IoT thing based on the IMSI number and updates the thing's shadow reported state


 Having this, will make the thing shadow update at every message received from Funnel:
Now, as we the all the information from the GNSS Tracker the things shadow, we can build addition features over it.
Note: the downside of Funnel is that does not seems to support downstream communication.> Soracom Connectivity: Beam
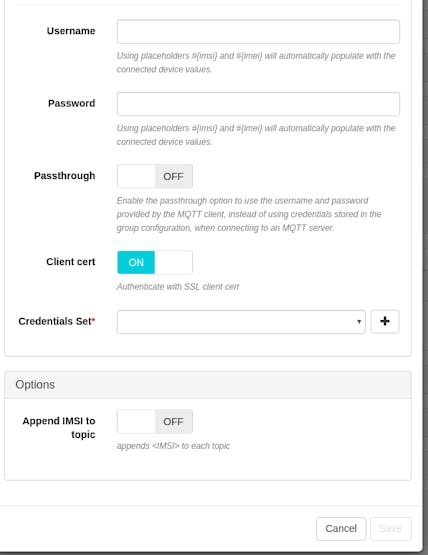
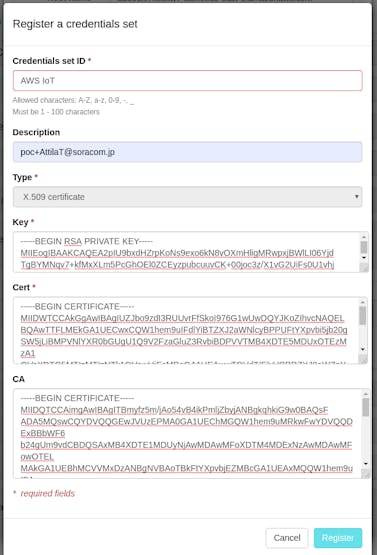
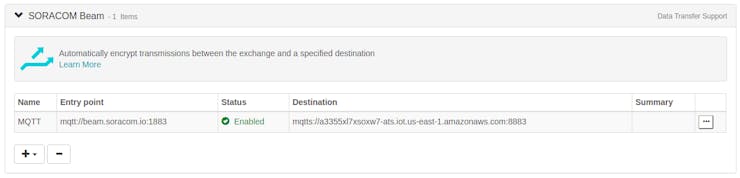
With Soracom Beam we can make HTTP(S) / MQTT(S) endpoints from different cloud providers available for Soracom AIR devices, while the encryption is being offloaded from the end devices. As it can be configured to expose a MQTT interface to the AWS IoT, we can use it for both upstream and downstream communication.The downstream communication is useful because it allow to control the end devices remotely. We can use the IoT device shadow feature, to alter the setting of the a device. In the case of the GNSS Tracker we could for control things like the scan / upload rate, activate motion detection / etc.Beam has support for client certificates, which can be used for mutual authentication with the AWS IoT. Note: The current implementation of client certificates seems to have a limitation, that makes it unsecure for multi device use. Namely, a single client certificate is used for all the Soracom Air devices (ref), instead of using a one psychical device = one certificate approach.Because of the above limitation, in AWS IoT the policy attached to the client certificate must allow access to all the IoT Things / devices. This means a compromised device, even if doesn't stores psychically stores the certificate, though the Beam MQTT endpoint can be used to gains access to all the devices.Beam can be enabled from the Soracom User Console, in the Group settings, as follows:use the + button to create an MQTT (Soracom) -> MQTTS (AWS IoT) endpointenable Client cert and create a Credential set using the client certificates from your AWS IoT Thing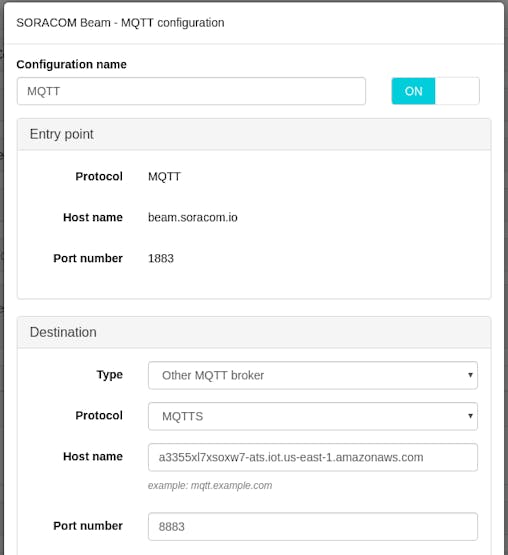
 Having this, from the Wio LTE(see the mqtt examples from the Wio LTE for Arduino) we should be able to access the the MQTT interface of the AWS IoT.From there we should by subscribing / sendingmessages to the appropriate topics, to access the access / control the IoT device shadow.
> IoT Rules: Notifications, Data Analytics and Visualization, Mobile & Web Interfaces
An IoT Rule can be used to connect AWS IoT with other AWS services.A IoT rule start with an SQL query, which is used select the source message from an MQTT(s) topics. For example the query we used before Funnel example:SELECT * FROM 'gnssTracker/#' select all the messages from thegnssTracker/* topics.Basic filtering and transformations are also supported. For ex:SELECT state.reported AS gnssPos FROM '$aws/things/GNSS_Tracker_001/shadow/update/accepted' WHERE gnssPos.lat > 46.00 OR gnssPos.lng < 25.00
can be used extract the current GNSS position from the thing shadow, if the it matches a given condition: lat > 46 OR lng < 25.Along the query, the rule also needs an action. The action basically can anything:send a notification via , store the message in , and or in an instancesend the message to an instance or streamRule Based AlertsThis example from Amazon shows how to an IoT rule with an SNSaction to implement a simple rule based email alert. The same can be implemented for other type of notifications like SMS, Push Notification and others. For a more complex checks an SQL query may not be enough. In can implement the check in a Lambda function, and use the AWS SDK-s to send notifications through SNS.For example, such a complex check would be to ensure if our GNSS Trackerremains in a predefined zone. To implement such a check we can:store the perimeter of the allowed zone in the device shadow's desired fieldcreate an IoT rule that calls a lambda function each time the device shadow's reported field is updatedin the lambda function, we can check if the GNSS Tracker is still in the allowed zoneif not, generate an email / SMS / push notification Data Analytics and Visualization(concept)For data analytics and visualization we can use IoT Analytics and QuickSight:with IoT Analytics we can analyze large amount of data collected from IoT devicesQuickSight can be used visualize data in different forms, like charts and dashboards. It also has support for displaying For data storage, especially for high volumes, we can consider using Kinesis Data Firehose. The Firehose delivery streams can be configured to streamdata from / to / between AWS IoT, data storage(S3 buckets, Dynamo DB), analytics tools and other services.Mobile & Web Interface(concept)For better usability we could also create mobile and web interfaces for the GNSS Tracker:the two apps would allow to the users to manage one or more GNSS Tracker deceives. The interface would show current and historical locations of the device, and would allow to change config settings.the implementation would be done using Lambda functions interacting with other AWS servicesthe authentication would be done
 From Prototype to Product
So, what would take to turn this PoC device into a real product?Actually, not that much. If we add simple mobile or web interface, the device would be ready to be used (safely) by multiple users.After that, the rest of the features like:could be added gradually.
How much it would cost to manufacture and operate a GNSS Tracker device? It's hard to tell. Both the Soracom and AWS services are payed on a pay what you use basis, so the operation cost will depend much on the usage rate.Here is a rough cost estimation:WioLTE + Soracom AIR SIM + MPU-6050 + enclosure - ~ $100-110 - would be lower for mass produces productSoracom Harvest / Beam / Funnel - ~ $1-5 / device / month - depends much on the usage rateSoracom Lagoon - Free or $ 8.9 / month - depending on the number of usersAWS IoT - ~$1-5 / month -depends much on the usage rateAWS Lambda Functions - free - $2 - depends much on the usage rateother AWS services - depends much on the usage rate and serviceCheers!Notes: For most of the stuff described in the project, the code samples and configuration files can be found in the GitHub repository- if something is not clear don't hesitate ask a question in the comments section. I will try to answer it